Step-By-Step FP 2000 Tutorial For Creating an Electronic Teaching Portfolio
How to Create a New FrontPage Web
1. Start FP 2000 (Start > Programs
> Microsoft FrontPage)
2. Go to File menu and click New, and click Web
3. Select Empty Web from the Web Sites list
4. Under Options (on the right), in the "Specify the location of
the new web" box, type the location of the new web.
For example:
5. Click OK
6. Say Yes to "convert into a FrontPage web".
How to Open Your FrontPage Web
1. Start Microsoft FrontPage
2. Go to File menu and click Open Web
3. Find the location of your web in the Look In box
4. Select the web and click Open
Layout Considerations
Once you have collected the items you
want to include in your portfolio and organized your content, you are ready
to decide on a layout template for your portfolio web. FP 2000 has some
ready made templates to choose from, or you may create your own.
The choices can be viewed in the FP 2000 program by choosing
File > New > Page

A useful layout is "One-column Body, with Contents on Left" template. The advantage to this layout is that a Table of Contents is always visible. Also, if this template is used for each section of your portfolio, the same Table of Contents is always visible to the viewer. This makes navigating your portfolio easy.
"Normal Page" is a basic blank page. It also is well suited for web layouts. Lists or Tables may be inserted on the "Normal Page" to contain the hyperlinks to the various sections of your portfolio.
Your main or home page should contain hyperlinks to the various sections of your portfolio. It should also introduce the viewer to your portfolio. Also every page in your portfolio should have a link back to the home page (or a navigation strip/bar).
If you have taken time to explore other portfolios, you probably have an idea of the format you want.
How to Choose a Page Layout
Template
1. Open your web
2. Click File > New > Page > Normal Page
(or another layout template if you prefer)
3. A blank white page will be opened
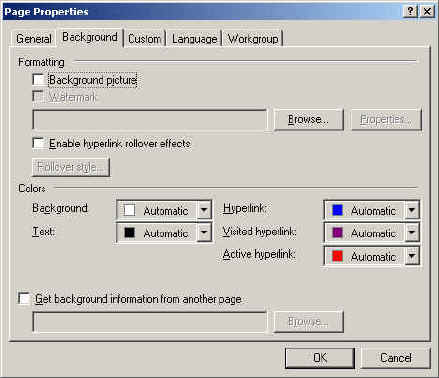
4. Customize the page properties (go to Format menu > Background)
and choose a background color, text and hyperlink colors (make sure the text
colors will go with the background). Add your heading to identify your web.
5. Click File > Save
6. Save this file as index.htm (this
will be your home page and the default opening page of your web)
How to Format Page Properties
Another way to format the Page
Properties is to "right click" the mouse somewhere on the page and
choose Page Properties from the pop-up menu.

How to change a background color
1. Right Click on the page > Page
Properties > Background
2. Click the Background down arrow and select a color from the drop down list
3. You may also change the text color.
4. Click OK
How to work with text
The text functions in FrontPage like it does in word processors. However,
there are a few quirks. Double spacing is the default. In order to get single
spacing you must press Shift + Enter at the end of each line. Times
New Roman is the default font. If you change it, be aware that all fonts do
not always display properly on all computers. Options for text appear on the Formatting
Toolbar. If it is not visible, go to the View menu and place a check by Formatting.
The Formatting Toolbar looks like this:
![]()
How to Create a Hyperlink
Type the text that you want to be the hyperlink
and select it.
![]() Click the
hyperlink button on the standard toolbar
Click the
hyperlink button on the standard toolbar
OR
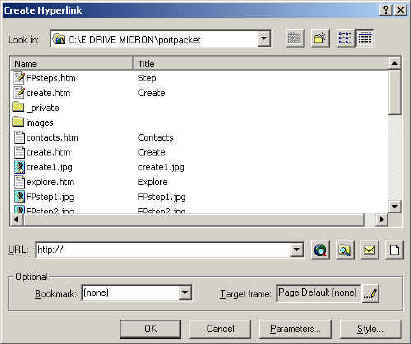
1. Go to Insert menu > Hyperlink

2. You have a few choices: you can link to a new page, a file (on your computer or a floppy disk), a web address, an email address, or a bookmark. Click on your choice (browse to find the file, type in the web address, or choose the new page layout).
Remember to check the Help menu if you are confused or need some clarification!
How to Create a Bookmark
1. Select the text for the bookmark target.
2. Go to the Insert menu and click Bookmark
3. Type the name for the Bookmark in the
Bookmark Name field.
4. Click OK
5. Create the hyperlink that you want to link to the bookmark (under
Optional in the Create Hyperlink dialog box).
How
to View Pages
Click the Preview Tab at the bottom of
the page.
OR
Go to File > Preview in Browser > Choose Browser
> Preview
OR
![]() Click the Preview in Browser button on the
Toolbar
Click the Preview in Browser button on the
Toolbar
How
to Change views in the FrontPage Editor
1. Go to the View menu and click Folder
List. The screen will show two areas. One will be the folder (and file) list
on the left, and the other side will be where the files open in the editor.
2. Double click the file you want to open and view. The file will open on the
right side in the editor window.
If you want a full screen for working in the editor, click the folder list tool
again.
How
to Add Tables
Tables are a useful way to place text and
pictures where you want them on the screen and control the appearance of the web
page. Tables consist of columns (vertical) and rows (horizontal). The cells of
tables can be created in various sizes. Also, tables can be embedded in other
tables.
1. Go to Table menu > Insert Table
2. Enter the number of columns and rows that you want (you can always insert
additional rows and columns later if you wish).
3. Choose whether or not you want borders to be visible.
4. Choose the width for the table (100%, 80%, 50%)
How
to Change Table Properties
Place the cursor inside the table and
right click the mouse and choose Table Properties.
OR
1. Go to Table menu > Table Properties
2. Change the properties you wish.

How
to Insert an Image
1. Place the cursor on the page where you
wish to insert the image.
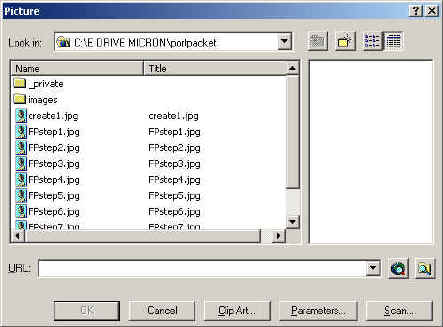
2. Click the Insert Picture from File button on the toolbar ![]() .
.
OR
3. Go to Insert menu > Picture > From File

3. Click the From File button in the Picture
dialog box ![]()
4. Browse the Look In box to find the saved
image
5. Click on the image you want > click OK
6. The image is inserted on the page.
You may resize the image on the page by clicking on it to select it and then
dragging the corner diagonally until the image is the size you want.
How
to Edit an Image Using the Image Toolbar
1. Click on the image to select it. This
will activate the Image Toolbar
![]()
2. Use the various tools to edit the image. Use Help to learn how the tools work.
How to Add a Sound or Multimedia File
1. Select the text or image that you wish
to hyperlink to a sound or multimedia file.
2. Go to Insert menu > Hyperlink

3. Click the button
in the Create Hyperlink dialog box.
4. Browse the Look In box to find the file you want
5. Click on the file > OK
Tips
Right clicking the mouse on the page activates a context sensitive pop-up box showing the various properties that may be changed (Page Properties, Table Properties, Cell Properties, Hyperlink Properties, Image Properties, etc.).
FrontPage Help is an excellent source of information.
NEC.edu | Technology Learning Packets Main Page
© Joel Black 2001